
Welcome to Account Management & Billing! In this section, we’ll explain how to track your GoodHelp.AI usage, understand your billing structure, manage team members and their permissions, and connect or remove essential services like WordPress and Google Search Console.
Overview
By the end of this section, you’ll know exactly where your costs come from, how to keep your billing info up to date, and how to give your team the right level of access to GoodHelp.AI’s features.
Billing & Usage
1. Understanding Work Unit Costs
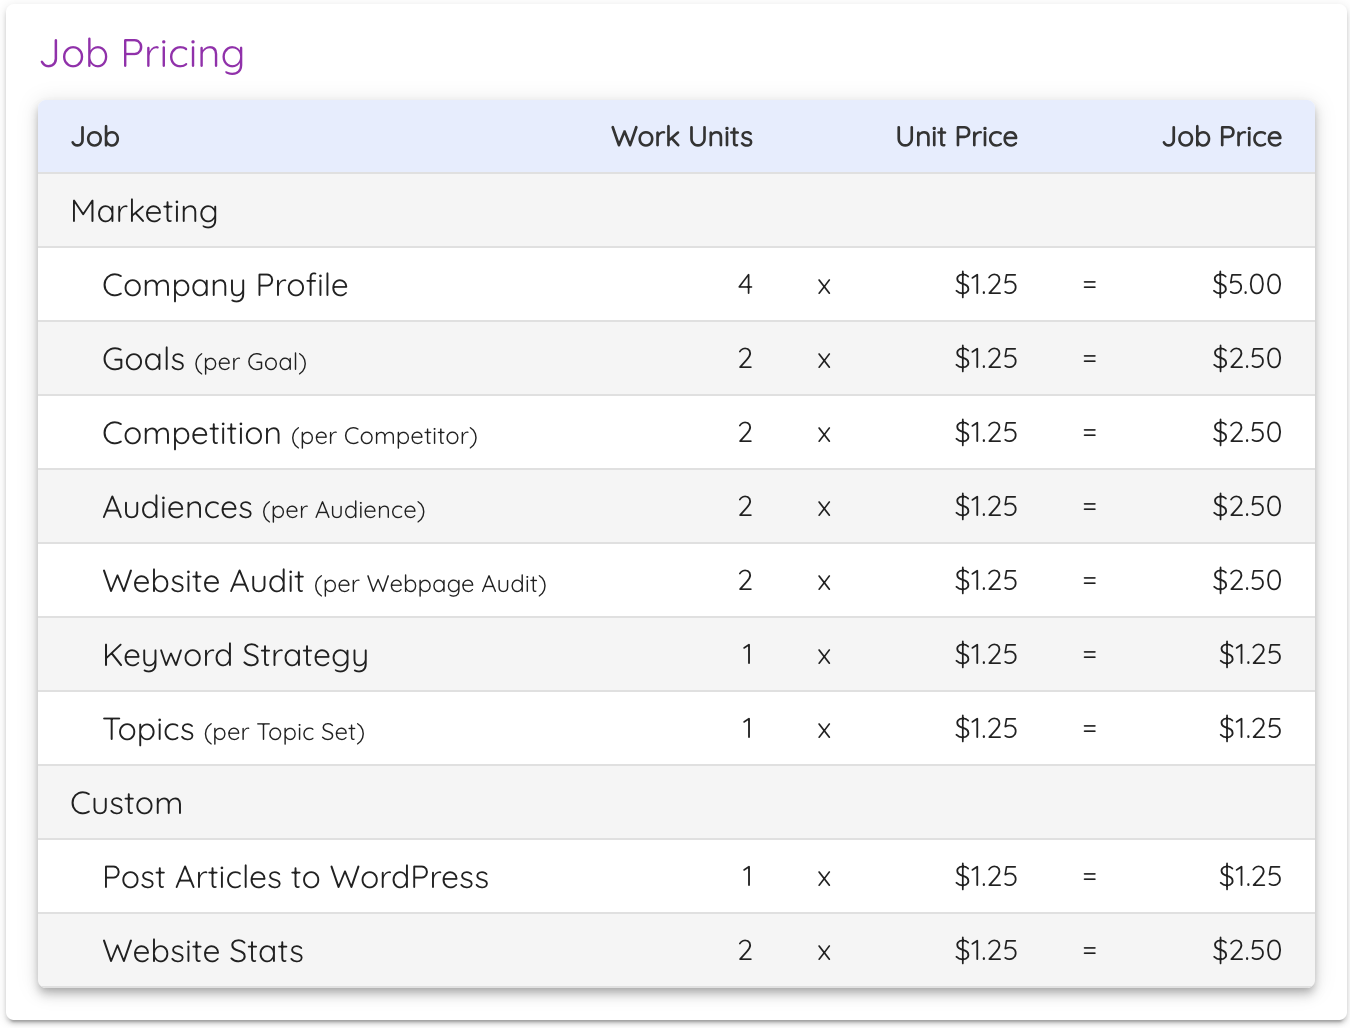
GoodHelp.AI uses a “work unit” system to calculate the cost of each job (such as creating a Company Profile, generating Keyword Strategy, or publishing articles to WordPress). Your Service Plan page outlines how many work units each job type requires and the cost per unit.
Work Units & Job Pricing
- Each type of job (e.g., Company Profile, Goals, Competition) is assigned a certain number of “work units.”
- The Unit Price is the cost per work unit. Multiply the number of work units by the unit price to find the Job Price.
- Example: If a Company Profile = 4 work units, and your unit price is $1.25/work unit, then the total cost for a Company Profile is $5.00.
Tip: This breakdown helps you forecast your monthly spend by estimating how many jobs you plan to run.
2. Viewing Invoices & Usage History
GoodHelp.AI makes it easy to track your usage over time. You’ll see a graph of Daily Usage (USD) alongside Itemized Usage for each job.
- Go to Account > Usage
- Here, you’ll see a daily usage graph for the selected date range.
- Beneath the graph, an Itemized Usage table shows details like Date, Job, User, and Charge.
- Adjust the Date Range
- Use the arrow navigation to move between billing cycles or custom date ranges.
- The Period Total at the top right shows the cumulative cost for that period.
- Billing
- Click on Account > Billing to view your Service Plan in more detail.
- Under Invoices, you can view your past invoices, each with options to Download invoice or Download receipt using Stripe.
Note: If you need an official receipt for accounting, download it directly from the invoice view.
3. Managing Payment Methods
To ensure uninterrupted service, you must have at least one valid payment method on file. GoodHelp.AI bills monthly for the jobs performed during that period.
- Navigate to Account > Billing
- Scroll to “Payment Methods”
• You’ll see your current card on file (e.g., AMEX •••• 8022).
- Add or Remove Cards
• Add Payment Method to register a new card. You can also add Google Pay here.
• If you have multiple cards, you can set one as the default payment method.
• To remove a card, click the Remove or Delete button next to it.
- Check Your Invoice
- Your invoice will be automatically charged to the default payment method at the end of each billing cycle.
- You can view or download the invoice for each billing cycle from the Invoices section.
Tip: Always keep your payment details current to avoid any interruption in generating or publishing content.
Credits & Refunds
If you’re not satisfied with the output from a job, GoodHelp.AI offers two ways to receive an account credit depending on when you request it.
1. Full Job Credit (Within Grace Period)
After a job completes, you have 7 days to reject the entire job and receive a full account credit for the original charge.
How to request a full job credit:
- Go to your job list and open the completed job you want to reject.
- Click the Reject button.
- In the rejection dialog, you’ll see an info banner confirming the full credit amount and when the grace period expires.
- Enter a reason for the rejection and click Confirm.
The full job charge is credited back to your account as a negative balance. This credit is automatically applied to your next invoice. If the credit exceeds your invoice total, the remaining balance carries forward to future invoices.
Note: The 7-day grace period countdown is displayed in the rejection dialog. Once the grace period expires, full job rejection is no longer available — but you can still reject individual content items (see below).
2. Proportional Content Credit (After Grace Period)
After the 7-day grace period expires, you can still reject individual content items (such as articles, topics, or other deliverables) for a proportional share of the original job charge.
How to request a content credit:
- Navigate to the content item you want to reject.
- Select the item and click the Reject button.
- A dialog will confirm that a proportional account credit will be applied.
- Click Confirm to reject the item and receive the credit.
How the credit is calculated:
The credit for each rejected item equals the total job charge divided equally among all items the job produced, rounded down to the nearest cent.
Example: If a job cost $4.00 and produced 3 articles, each rejected article credits $1.33 (= $4.00 ÷ 3, rounded down).
Note: Manually created content (not associated with a billable job) can be rejected to remove it from your workspace, but no credit is issued since there was no original charge.
3. Where Credits Appear
Credits appear as negative balance transactions on your account. You can see them reflected in:
- Account > Billing > Invoices — credits automatically reduce your next invoice amount.
- Your Stripe customer portal (if enabled by your organization).
4. Important Notes
- Each content item can only be credited once — rejecting the same item again will not issue a duplicate credit.
- If a job has already been fully refunded within the grace period, individual content items from that job cannot receive additional proportional credits.
- Credits are issued in USD and appear on your next billing cycle.
Tip: If you’re unsure whether to reject the entire job or individual items, check the rejection dialog — it will tell you which credit path is available based on the grace period status.
User Management
GoodHelp.AI makes it easy to collaborate with multiple users under one organization. Each user has a role that defines their level of access—allowing you to securely share responsibilities and data without revealing confidential billing or organizational settings to every member.
1. Roles & Permissions
From the new screenshots, you can see two primary roles available:
- Owner
- Has full access to all features, including billing, usage, user management, and content creation.
- Can change other users’ roles and remove members.
- Able to manage connected services.
- Reader
- Has read-only access to view content, usage reports, and other non-sensitive areas.
- Cannot generate new content or modify organization-level settings (e.g., billing, user roles).
Note: Newly invited members join with the Reader role by default. Owners can later upgrade them to Owner if needed.
2. Inviting a New Member
- Go to “Account” > “Members”
- You’ll see a list of current team members, each with their role and email.
- Click the “+” (Add Member) Button
- A popup titled “Add Member” appears.
- Enter Email Addresses
- Type one or more email addresses (comma-separated).
- When they accept the invite, they’ll be added as Reader.
- Send the Invite
- Click Add to finalize the invitation.
- Each invitee will receive an email with instructions to join your organization on GoodHelp.AI.
Tip: Once they accept, you can switch their role from Reader to Owner if you want them to have full permissions.
3. Changing or Removing Members
- Changing Roles
- Next to a user’s name, you’ll see a Role dropdown. Select Owner or Reader to instantly update their access.
- Removing a Member
- Click Remove on the far right to revoke all access for that user. They will no longer be able to log in or view your organization’s data.
Tip: You will have to have at least one Owner on your account who can handle billing and integrations, especially if team members come and go. You won’t be able to remove the user who is an owner, so if you’re switching owners, make sure to invite the user and set their permissions as owner before they remove you from the organization.
Managing Organizations
In GoodHelp.AI, an Organization is the central workspace that holds your jobs, usage, and billing. You can think of each organization as a separate “account” or “environment.” This is particularly useful if you manage multiple businesses or brands under one GoodHelp.AI login.
What Are Organizations?
- Separate Workspaces
Each organization has its own content, policies, members, usage reports, and billing settings. One user can switch between multiple organizations if they have permission.
- Independent Billing
If you have two or more organizations, each will have its own payment method(s), monthly invoices, and usage tracking.
- Member Roles
Members can be added on a per-organization basis. This means you could be an Owner in one organization and only a Reader in another.
Tip: If you run multiple businesses or want to keep client data separate, create a new organization for each entity.
Creating a New Organization
- Go to “Account” > “Organization”
- You’ll see a table listing your existing organizations and their Role (e.g., “OWNER”) and Created date.
- Click “+ Add Organization”
- A popup titled “Add Organization” appears.
- Enter Organization Details
- Name: A descriptive name for this new workspace (e.g., “Acme Corp” or “Personal Projects”).
- Billing Email: The primary email for receiving invoices and billing updates.
- Save
- Click Add to finalize the new organization.
- A reminder appears stating you’ll need to set up billing for this new organization before starting any jobs.
Note: Once an organization is created, switch to it in the top-left dropdown (where you see your organization’s name) to view or manage its content, usage, and billing.
Switching Between Organizations
- Use the Organization Dropdown
- At the top of the left sidebar, you’ll see a dropdown (e.g., “Minute7.com”).
- Click it to select another organization, such as “Personal” or “Client X.”
- Different Workspaces
- After switching, you’ll see content, members, and billing info specific to that organization.
Removing an Organization
- Open the “Organizations” Screen
- Navigate to Account > Organization.
- Find the Organization You Want to Remove
- Next to it, click the Trash icon.
- You’ll be prompted to confirm your decision—removing an organization deletes all associated content, usage records, and data.
- Confirm Removal
- Once removed, it can’t be restored. Ensure you have all necessary backups or exports before you proceed.
Caution: Removing an organization is permanent. If you no longer need an organization, you might consider leaving it inactive or removing your payment method instead.
Connected Services & Integrations
Connecting external services to GoodHelp.AI can help you automate your content workflow, gather valuable insights, and streamline your marketing efforts. Below are the main services you can integrate, along with screenshots showcasing how each setup looks in the Connected Services area.
1. Google Search Console
Linking Google Search Console allows GoodHelp.AI to pull search performance data for your website. This integration powers features like Website Audit and Keyword Strategy, giving you real-time insights on impressions, clicks, and search terms.
- Go to “Account” > “Connected Services”
- You’ll see tiles for Google Search Console, Google Analytics, WordPress, and others.
- Select “Google Search Console”
- Click Start Authorization (if not yet connected) or Manage (if you’re updating settings).
- Authorize Access
- A prompt asks you to sign in with the Google account that manages your site’s Search Console property.
- Set Your Site URL
- Once authorized, choose your verified property from the dropdown (e.g., sc-domain:minute7.com).
- Click Save to confirm.
Tip: If you don’t see your site listed, ensure that property is verified in your GSC account under the same Google login.
2. WordPress
If you’re using WordPress, connecting it to GoodHelp.AI streamlines publishing. Generate articles in GoodHelp.AI, then push them directly to your WordPress site—no copy-paste required.
- Click “WordPress” under Connected Services
- Enter Your Credentials
- Username: Your WordPress admin or editor username
- Site URL: The base URL for your WordPress site (e.g., https://example.com)
- Password: The password for your admin/editor user
- Authorize & Save
- Click Save to complete the integration.
- If successful, you’ll see WordPress listed as Connected.
- Publish from GoodHelp.AI
- Next time you generate an article, choose Publish → WordPress, select your site, and confirm.
Adding or Removing Integrations
- Add Integration: Click the “+” icon on the main Connected Services page to see available services. Select one and follow the authorization prompts.
- Remove Integration: Open the service’s tile or settings, and look for Remove or Disconnect. This action revokes GoodHelp.AI’s access and stops any data syncing.
Wrapping Up
With Billing & Usage, Credits & Refunds, User Management, and Connected Services:
- You can request credits for unsatisfactory work—either a full job refund within 7 days or a proportional credit for individual items after that.
- You can easily invite new members as Readers or Owners, ensuring the right people have the right level of access.
- You’ll efficiently integrate core tools—like Google Search Console for SEO data, Google Analytics for traffic insights, and WordPress for seamless publishing.
These features let you scale your marketing efforts with confidence, knowing that your team can collaborate securely and your essential data flows smoothly into GoodHelp.AI.
If you have any questions about roles, permissions, or connecting third-party services, be sure to check out our Troubleshooting & FAQs section or contact support.